Shelf Styling for a Small Apartment: How to Arrange Shelves as Decor
A seven-step method for shelves that look arranged instead of cluttered or bare: clear them, sort by color and height, build each shelf from an anchor, a tall piece and a small one, then leave some space empty.
At a glance
- Difficulty
- Easy
- Time
- About 45 to 90 minutes for one shelving unit
- Best for
- Open bookcases and wall shelves that look cluttered or sparse
- Renter note
- No fixings needed when you are restyling shelves that are already in place
What you need
- Your books and objects
- A dust cloth
- Two or three matching baskets or lidded boxes
- A bookend or heavy object
- One trailing plant or a vase of stems
Shelves tend to end up in one of two states: packed edge to edge with everything you own, or holding three lonely objects that look as if they are waiting for the rest to arrive. Both come from adding things one at a time with no plan.
Good shelf styling is a repeatable method, not a talent. You empty the shelves, sort what you have and rebuild each shelf from three kinds of object. In a small apartment, where open shelves are often in full view from the sofa and the bed, an afternoon spent on this changes how the whole room looks.
Step 1: Clear everything off
Take every item off every shelf and wipe the surfaces. It is tempting to nudge things around in place, but an existing arrangement keeps pulling you back to itself. Empty shelves let you see the unit as a whole: how many shelves, how tall the gaps are, and which ones sit at eye level and so get looked at most.
Step 2: Sort by color and height
Lay everything out on the floor or the bed and make loose groups.
- By color: put similar tones together and notice which two or three colors appear most. Those become the shelf palette. Items far outside it can live somewhere else.
- By height: separate tall things (vases, a lamp, upright frames), medium things (books, boxes, plants) and small low things (bowls, dishes, little objects).
- By job: set aside what you reach for every day. It gets its own place in Step 7.
This is also the moment to be honest. Anything you neither use nor like looking at does not need to go back.
Step 3: Build each shelf from three parts
Each shelf, or each section of a long shelf, gets the same three ingredients:
- An anchor. The largest element: a row or stack of books, a box, a big bowl. Place it first, slightly off-center.
- A vertical element. Something with height that breaks the horizontal line of the shelf: a tall vase, a candlestick with a flameless LED candle, a frame leaned against the back.
- A small, low element. A little dish, a stone, a tiny pot. It sits in front of or beside the anchor and finishes the group.
Let the pieces overlap a little from front to back so they read as one composition, not a lineup.
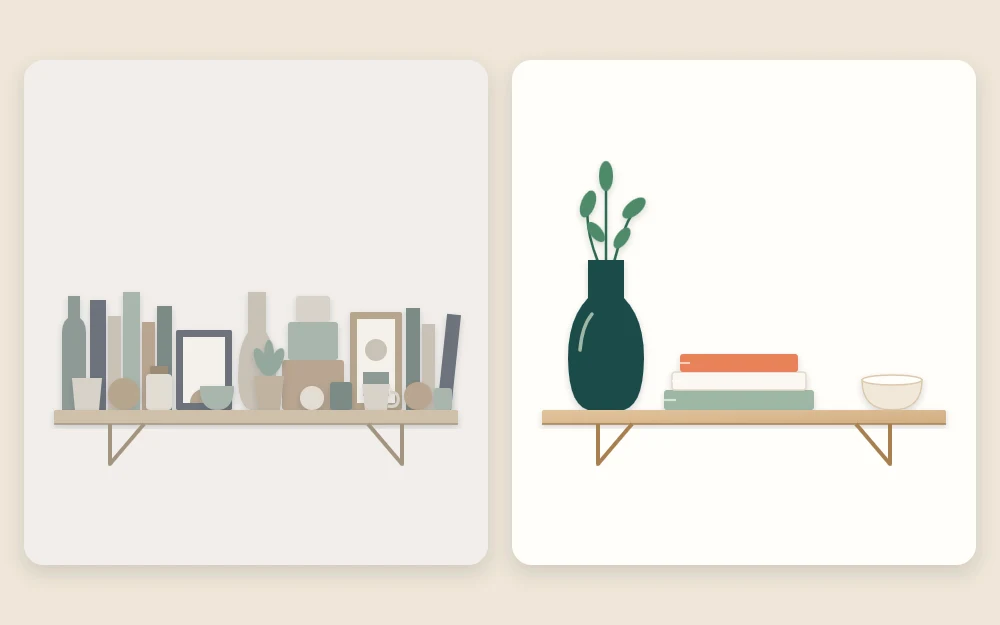
A leaned frame works well as the vertical element. If you find you mostly want to show art, a picture ledge arranged in layers may suit you better than a deep shelf.
Step 4: Zigzag the heights
Now step back and look at the unit as a whole. If the tallest item on every shelf sits on the left, the arrangement leans. Alternate instead: tall element on the left of the top shelf, on the right of the next, back to the left below. The eye travels down the unit in a gentle zigzag.
Do the same with visual weight. Avoid stacking all the dark, solid things in one column; scatter them so each shelf has one heavier note and some lighter ones.
Step 5: Arrange books two ways
Books are the easiest anchors you own, and they look best when they are not all doing the same thing.
- Upright: a row of books standing together, tallest toward the outside edge, held by a bookend or a heavy object. Let the row fill only part of the shelf.
- Stacked: three to five books lying flat, largest at the bottom. A stack makes a small platform for a bowl or a plant and lifts a short object to a better height.
Mix the two across the unit, and line the spines up with the front edge of the shelf for a clean face.
Step 6: Leave space and repeat colors
As a loose guide, leave roughly a third of each shelf empty. Empty space is what lets the eye pick out individual pieces; without it, even beautiful objects blur into clutter. If a shelf looks crowded, remove one item before you try rearranging.
Then check the palette you chose in Step 2. Each of your two or three colors should turn up on at least three different shelves, so the unit hangs together. One green element helps nearly every arrangement: a trailing plant softens the hard edges, and this guide to styling plants in tight spaces covers matching the plant to the light the shelf really gets.
Tip
Look at the shelves from across the room, where you normally see them, not from arm’s length. Squinting helps: you should see a few clear shapes with gaps between them.
Step 7: Give the lowest shelf to everyday things
The items you set aside earlier, such as chargers, remotes, papers and spare cables, still need a home. Put them in baskets or lidded boxes on the lowest shelf. Down there the containers ground the unit visually, and what is inside stays easy to reach and out of sight. Two or three matching containers look calmer than a mix; there are more options in these ideas for baskets, boxes and trays.
Respect what the shelf is made to carry
Styling should never ask more of a shelf than it was built for. Shelves carry only what their maker rates them for, so check the instructions that came with the unit before lining up a full row of heavy books, and keep the heaviest items low.
Good to know
For shelves fixed to the wall, the hardware has to suit your wall type and the weight the shelf will carry, following the manufacturer’s instructions. Get help if you are unsure, and check your lease or ask before making changes. For a tall freestanding unit, follow the maker’s guidance on securing it.
Frequently asked questions
How many things should go on one shelf?
Fewer than you think. A useful starting point is three elements per shelf or per section: one larger anchor, one tall piece and one small low piece. On a long shelf you can repeat that group twice with a clear gap between. If the shelf still feels busy, take one item away.
Should books stand upright or lie flat?
Both, mixed across the unit. Upright rows hold the most and give strong vertical lines, while flat stacks of three to five break up the pattern and make a platform for a small object. Alternating the two from shelf to shelf keeps a bookcase from looking like a library wall.
Why do my shelves still look cluttered after tidying?
Usually because there are too many small items or too many colors. Swap several little objects for one larger piece, limit the shelves to two or three colors that repeat, and move everyday odds and ends into baskets on the lowest shelf. Leaving part of every shelf empty does most of the remaining work.